ProTips
Your Guide to Winter Construction with Eagle Industries
Stay productive through the cold. Discover how Eagle’s winter solutions keep jobsites protected, safe, and on schedule all season long.
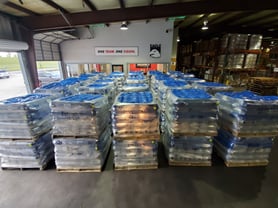
Cover what matters with Eagle’s Disaster Relief Tarps. Strong, reliable, and ready when the storm clears.
A Quick Guide for Storm Recovery & Roof Protection
When hurricanes strike the Gulf South, damage to roofs, windows, and structures is often immediate and widespread. Disaster Relief Tarps are one of the most essential tools in the recovery process, helping to prevent further damage while giving homeowners and contractors time to assess and rebuild.
But not all tarps, or tarp jobs, are created equal. Whether you're covering a home, business, or equipment, here are Eagle’s five key tips for getting the most out of your emergency tarp after a storm:
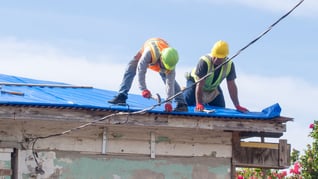
1. Use the right tarp for the job
After a storm, it's tempting to grab any plastic cover available. But storm recovery requires tarps that can hold up under pressure. Look for these features:
For longer-term protection or high-wind zones, roofing shrink wrap or woven reinforced plastics provide even stronger coverage.
2. Prioritize safety first
Tarp installation often happens quickly and in unstable environments. Before climbing on a roof or working near storm debris:
If your roof looks structurally unsound, call a licensed contractor before proceeding.
3. Anchor the tarp securely
Improper anchoring is one of the most common causes of tarp failure. Here’s how to do it right:
If you’re covering a flat surface like equipment or flooring, tie the tarp tightly and weigh it down evenly around the edges.
4. Cover early to minimize damage
Install your tarp as soon as it's safe to go outside, ideally within hours of the storm passing. Why it matters:
Keep your tarp, gloves, nails, and utility knife in an accessible bin before the storm hits.
5. Check and replace as needed
Disaster Relief Tarps are temporary by nature. Depending on the weather and exposure, they may need reinforcement or replacement, even after a few weeks. Here’s what to watch for:
For coverage longer than 30 days, consider using heavier-duty tarps or shrink wrap systems.
The bottom line?
Since Hurricane Katrina in 2005, Eagle Industries has provided reliable tarp products to disaster response teams, contractors, and families across New Orleans and the Gulf Coast.
Want to learn more? Visit eagleind.com or reach out to our Sales Team at sales@eagleind.com.
Stay productive through the cold. Discover how Eagle’s winter solutions keep jobsites protected, safe, and on schedule all season long.
Safeguard your jobsite with Eagle’s Fall Protection Netting, built for real risks, designed to prevent falls and rooftop hazards without slowing work.
At Eagle Industries, testing isn’t an afterthought. Every product is third-party tested for safety, reliability, and compliance before it reaches...